Share
Pin
Tweet
Send
Share
Send
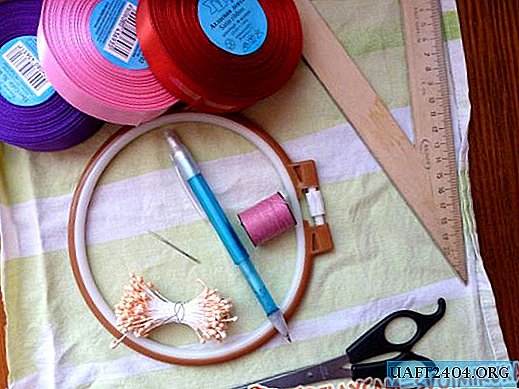
ribbons of three colors 2.5 cm, one tape 0.5 cm;
hoop;
scissors;
ordinary sewing thread, harmonizing in color with ribbons;
needle with a wide eye.
The first thing we cut off from each (wide) tape is several segments of 25 centimeters. The edges are carefully fused with a lighter. This is done so that in the process of embroidery and subsequent washing, the edges, or rather the outermost threads, do not fray and the flower does not melt in the hands. Then, each stitch is sewn with a simple thread with the usual basting stitch. For clarity, next to the already stitched tape scheme.

At one end we make a strong knot, and at the other end, carefully pull the remaining end of the thread and pull the ribbon into a flower.

Now, securely fasten the work done with a thread and fasten (sew) the flower on the fabric in the selected place.

The number of colors of one color or another is completely up to you and your taste.

I decided that on my canvas there would be such a composition of ribbon flowers.

The work is almost ready. Now you can start filling in the middle. Initially, I wanted to fill them with artificial stamens, which can easily be found on the shelves of needlework stores. But in the process, I changed my mind, giving my preference to the "French knot." He is doing so. A thin ribbon is threaded through the needle.

Then, one of the ends bends half a centimeter back twice.

With the tip of the needle, we pierce the crease exactly in the cent, and stretch the entire tape through the puncture until such a knot is obtained.


The second end I prefer to leave free (as with the basting), only slightly melt the thread. This is best done at the bottom of the flame so that the edge remains plastic, not plastic.
So, the knot. On the Internet you can find many different knots, but I liked this one. The thing is that it is very simple to execute, and it almost always turns out to be excellent even on the first try. We take out the ribbon from the center of the sewn flower.

Then we attach the needle to the tape closer to the base and wrap it several times.

Now we puncture the fabric with the needle down, next to the place where it went to the top. Carefully, gently pressing with your finger, we bring the entire tape to the wrong side. Such a small knot should remain on the front side.

We make similar nodules in all flowers.

We can consider the work done. It remains only to find a suitable round frame.

Share
Pin
Tweet
Send
Share
Send