Share
Pin
Tweet
Send
Share
Send
![](http://img.uaft2404.org/img/sdela-2019/master-klass-po-upakovke-detskogo-podarka.jpg)
Materials for the master class:
- a sheet of cardboard;
- colored paper;
- colored pencils or felt-tip pens;
- tape measure;
- chocolate candy;
- centimeter tape, scissors, glue.
Working process:
1. We take a gift that we will pack, in this example this is baby soap, and with a tape measure we measure the width around the perimeter.
![](http://img.uaft2404.org/img/sdela-2019/master-klass-po-upakovke-detskogo-podarka-2.jpg)
2.Now we measure the length of the front and side of the future gift.
![](http://img.uaft2404.org/img/sdela-2019/master-klass-po-upakovke-detskogo-podarka-3.jpg)
3. To the obtained values, add 1 cm to the hem and lay them on a sheet of colored paper.
![](http://img.uaft2404.org/img/sdela-2019/master-klass-po-upakovke-detskogo-podarka-4.jpg)
4. We glue the main part of the box.
![](http://img.uaft2404.org/img/sdela-2019/master-klass-po-upakovke-detskogo-podarka-5.jpg)
5.Fold and glue the side parts.
![](http://img.uaft2404.org/img/sdela-2019/master-klass-po-upakovke-detskogo-podarka-6.jpg)
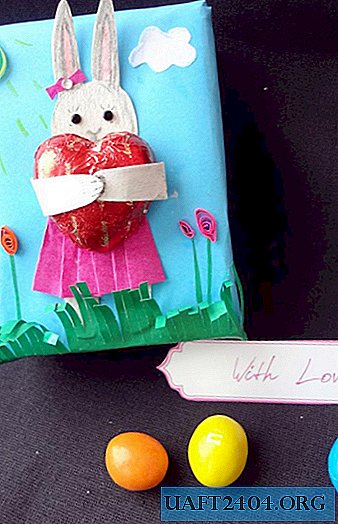
6. On a sheet of white cardboard we draw a hare pattern. Please note that the length of the paws of the hare must be of sufficient length so that it is enough for mounting on a candy.
![](http://img.uaft2404.org/img/sdela-2019/master-klass-po-upakovke-detskogo-podarka-7.jpg)
7. Cut out the hare.
![](http://img.uaft2404.org/img/sdela-2019/master-klass-po-upakovke-detskogo-podarka-8.jpg)
8. From pink paper, cut out a strip.
![](http://img.uaft2404.org/img/sdela-2019/master-klass-po-upakovke-detskogo-podarka-9.jpg)
9. We lay the folds of the future skirt.
![](http://img.uaft2404.org/img/sdela-2019/master-klass-po-upakovke-detskogo-podarka-10.jpg)
10. On the reverse side, grease the folds with glue.
![](http://img.uaft2404.org/img/sdela-2019/master-klass-po-upakovke-detskogo-podarka-11.jpg)
11. Paint the hare, glue the skirt.
![](http://img.uaft2404.org/img/sdela-2019/master-klass-po-upakovke-detskogo-podarka-12.jpg)
12.Glue a strip on top - this will be the skirt belt.
![](http://img.uaft2404.org/img/sdela-2019/master-klass-po-upakovke-detskogo-podarka-13.jpg)
13. Cut a green rectangle - 3 cm wide.
![](http://img.uaft2404.org/img/sdela-2019/master-klass-po-upakovke-detskogo-podarka-14.jpg)
14. This rectangle is cut into small strips, while not reaching 1 cm to the edge.
![](http://img.uaft2404.org/img/sdela-2019/master-klass-po-upakovke-detskogo-podarka-15.jpg)
15.Tighten the edges with a pencil.
![](http://img.uaft2404.org/img/sdela-2019/master-klass-po-upakovke-detskogo-podarka-16.jpg)
16. To the wrapping paper we glue the hare.
![](http://img.uaft2404.org/img/sdela-2019/master-klass-po-upakovke-detskogo-podarka-17.jpg)
17. From above the grass.
![](http://img.uaft2404.org/img/sdela-2019/master-klass-po-upakovke-detskogo-podarka-18.jpg)
18. The eyes of the bunny can be decorated with beads, and the eye with a paper bow.
![](http://img.uaft2404.org/img/sdela-2019/master-klass-po-upakovke-detskogo-podarka-19.jpg)
19. Take a chocolate candy, glue double-sided tape to its back side.
![](http://img.uaft2404.org/img/sdela-2019/master-klass-po-upakovke-detskogo-podarka-20.jpg)
20. Glue the candy to the hare.
![](http://img.uaft2404.org/img/sdela-2019/master-klass-po-upakovke-detskogo-podarka-21.jpg)
21. From colored paper, cut strips with a width of 0.2 to 0.3 mm.
![](http://img.uaft2404.org/img/sdela-2019/master-klass-po-upakovke-detskogo-podarka-22.jpg)
22.With the help of a quilling tool or split toothpick, we begin to reel the roll from a strip of yellow paper.
![](http://img.uaft2404.org/img/sdela-2019/master-klass-po-upakovke-detskogo-podarka-23.jpg)
23. Twist the roll.
![](http://img.uaft2404.org/img/sdela-2019/master-klass-po-upakovke-detskogo-podarka-24.jpg)
24. We glue the yellow roll-sun with PVA glue, draw the rays with a yellow pencil or felt-tip pen.
![](http://img.uaft2404.org/img/sdela-2019/master-klass-po-upakovke-detskogo-podarka-25.jpg)
25. Make droplets of flowers, for this we cut the pink strip in half, and twist the roll out of it, after which we flatten with its fingers on the edges.
![](http://img.uaft2404.org/img/sdela-2019/master-klass-po-upakovke-detskogo-podarka-26.jpg)
26. The resulting droplets of flowers are glued at the bottom of the box, in the grass.
![](http://img.uaft2404.org/img/sdela-2019/master-klass-po-upakovke-detskogo-podarka-27.jpg)
27. This composition can be supplemented with clouds of white cardboard, or what your imagination tells you. That's all our gift is ready!
![](http://img.uaft2404.org/img/sdela-2019/master-klass-po-upakovke-detskogo-podarka-28.jpg)
![](http://img.uaft2404.org/img/sdela-2019/master-klass-po-upakovke-detskogo-podarka-29.jpg)
Share
Pin
Tweet
Send
Share
Send