Share
Pin
Tweet
Send
Share
Send
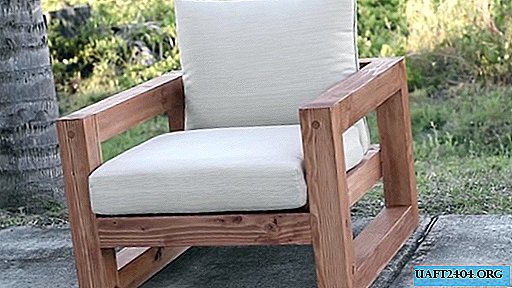
Currently, the furniture industry has literally overwhelmed the relevant market sector with a variety of products from all kinds of materials and all existing styles, from retro to techno. Many people are attracted to wooden furniture, but now it is too expensive for most who want to buy it.
But why not try to make it with your own hands, at least the simplest in design, not difficult to manufacture, and requiring ordinary tools? Undoubtedly, this type of furniture is a summer cottage or garden chair, made of wooden beams with a section of 8 × 8 cm or better 10 × 10 cm.
In order to make this type of furniture it is enough to have minimal skills in working with carpentry tools and have a general idea of the properties of wood as a material for machining.
The most suitable material for the manufacture of a country chair is oak, beech, pine, walnut, birch, ash. Their wood, which has undergone high-quality drying, is quite solid, and therefore strong, is not afraid of moisture, is well processed and, importantly, has a beautiful texture. Linden and alder can be used for the manufacture of lightly loaded parts.
Marking and preparation of blanks
Having determined the dimensions of the chair, we measure out the required length on the selected beam, taking into account the processing, and mark it using a construction tape, a metal triangle, a suitable pencil or marker.
Using a pendulum saw, we cut the beam into blanks, while trimming their ends. For the chair design we have chosen, we will need 16 blanks of a large cross-section of a square shape and 2 bars with sides half as much as the main blanks.
To give a neat appearance and improve the quality of the future assembly, we subject the milling process to each workpiece from all sides, including the end parts.


In the blanks that are designed to form the seat frame, in three we select the grooves in the wood floor at the ends, using a circular saw or a hand saw, and in two - in a quarter of the wood, for which we need an electric scraper and a manual chisel to finish the geometry of the grooves.


Assembly of a country chair
We assemble the sides of the product for glue, lubricating them with a brush, the ends and mates of the mating parts, and tighten them with clamps adjustable in length, preferably on a flat horizontal surface.


To mechanically strengthen the joints in their centers, we prepare blind holes for the heads of the coupling screws with an electric drill and a suitable drill. Then, with a smaller drill, set the direction of the clamping screws, which we screw in with a screwdriver.


Next, we rigidly connect the sidewalls with glue using the upper back cross member at the level of the armrests in height and flush with the rear legs and the rear cross member of the seat frame at a certain height using pre-prepared templates from multilayer plywood. So that they do not budge, we fix them with clamps.


According to the patterns, we set the cross-members, after having greased the ends and mates on the legs, with glue. Using a metal triangle, we check compliance with the right angle and, if necessary, upset the cross-beams.

We tighten the structure in the direction of the crossbars with clamps adjustable in length and strengthen the crosshairs with clamping screws.

We close all openings under the screw heads with wooden plugs for glue, cutting off the excess flush with the side surfaces.


Now we install the longitudinal side elements of the seat frame with grooves in a quarter of the tree at the level of its transverse elements.
In the grooves on the glue we fix a smaller beam, fix it with a clamp and fasten them with two or three screws each to the transverse elements of the seat frame.


On them we lay on glue three longitudinal beams with grooves in half a tree, using templates that specify the same distance between them and temporarily fixed clamps.
We fasten each of the three middle bars of the seat frame from two sides from the bottom to the small bars with two screws screwed flush (for this, we drill holes for the screw heads in advance using a drill).
Since the extreme bars of this element of the garden chair were not finally fixed, remove them, grease the grooves with glue and put them in place, fixing them with clamps until the glue has completely dried. The frame of our product is fully assembled, and all its elements are securely fixed to glue and with screws, forming a strong and rigid power structure.
Finally, we process all the faces of the frame with a grinding machine to obtain smooth and smooth surfaces.

Wipe them thoroughly with a slightly damp cloth to remove fine particles and wood dust and let the wood dry completely.
The last operation is a varnish coating that protects the wood surface from moisture, facilitates furniture care and emphasizes the natural texture of wood.

It remains only after the varnish has dried to establish pillows for the back and seat.
The chair is designed for both a child and an adult, and even for dad or mom with a daughter or son on her lap.
Concluding observations
When working on a country chair, one should not forget about the presence and serviceability of shields and protective elements on cutting tools. You should also wear long-sleeved clothing with a tight wrist closure. There should be gloves on the hands, safety glasses on the eyes. A respirator will not hurt to protect yourself from fine wood dust and varnish vapors that are not harmless to the human body.
For safety and greater aesthetics, it would not hurt to smooth out sharp corners, especially if there are small children in the family, and clothes will be goals. And under the legs it is worth stuffing rubber or plastic material so that moisture does not penetrate the tree and cause its rot.
To ensure that the chair lasts as long as possible and does not lose its operational and aesthetic qualities, it is advisable to remove it under the roof during atmospheric precipitation and for the winter and cover it with at least plastic wrap so that dust and other pollutants that soak in the atmosphere do not settle.


Watch the detailed video
Share
Pin
Tweet
Send
Share
Send

