Share
Pin
Tweet
Send
Share
Send
The stand should be stable, have height adjustment, have handrails. Stability will be ensured by choosing the right width, length, height. There will be no mechanical height adjustment, but three steps will be made, each at its own height. We will make handrails.
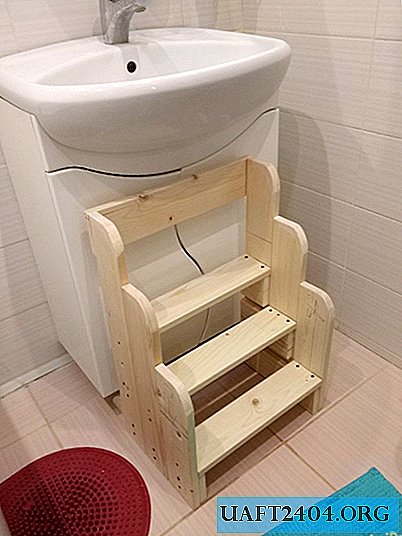
Materials and construction
Looking on the Internet did not find a suitable option. I decided to design myself. To begin with, I sketched a sketch in three projections: side view, front view, top view. The dashed lines show the contours of invisible parts; dimensions are given in millimeters. We will make it from wood and take finished polished boards. There are several reasons for this: the boards are easy to handle, fasten together, without problems you can cut the desired length. Pay attention to the sketch again.

Based on the drawing, we need boards of the following length:
- 1) board 620 mm - 2 pcs.;
- 2) board 500 mm - 2 pcs;
- 3) board 360 mm - 2 pcs;
side walls will be made of these boards, at the same time they will be handrails. We look further:
- 1) board 395 mm - 5 pcs., From 2 pcs. longitudinal guides for the first tier of the steps will be made, and from 3 pcs. stairs
- 2) board 185 mm - 2 pcs., Longitudinal guides for the second tier of steps;
- 3) a board of 90 mm - 2 pcs., Longitudinal guides for the third tier of steps (the uppermost).
- 4) 435 mm board - upper partition.
The height of the steps will consist of two values, this is the width of the board - 95 mm and the height of the board - 20 mm, total - 115 mm.

The required materials for making the baby stand will be as follows:
- 1) three boards 2 meters long, price 74 p. apiece, 3 * 74 = 222 p.;
- 2) wood screws with a length of 35 mm, 18 p. price per pack 30 pcs., 3 * 18 = 54 p.
Now we list the desired tool:

- 1) jigsaw or hacksaw for wood;
- 2) a screwdriver or Phillips screwdriver;
- 3) small skin on wood;
- 4) tape measure or ruler 70 cm and longer;
- 5) a pencil.
Action plan:
- 1. Marking boards;
- 2. Sawing boards to the desired length, rounding;
- 3. Assembling boards with each other using a screwdriver and self-tapping screws.
Markup. Before starting the marking, it is necessary to correctly "lay" all the sizes of small boards in a large board, so that there are as few scraps as possible, and better not at all. Having estimated on paper and a calculator this is what happened:
- 1) marking of the board No. 1: 620 + 500 + 395 * 2 + 90 = 2000 mm or 2 m;
- 2) marking of the board No. 2: 620 + 500 + 395 * 2 + 90 = 2000 mm or 2 m;
- 3) marking of the board No. 3: 395 + 360 * 2 + 185 * 2 + 435 = 1920 mm or 1.92 m.
As we can see, there will be no extra scraps at all, this is good.
We pick up a tape measure, a pencil, and mark each board on the list above. At the same time, do the marking from the edge, starting with a shorter length and ending with a larger one, i.e.: 90, 395, 395, 500, 620 mm. Then it will be easier to saw off.
Sawing. Everything is simple, take a jigsaw, a couple of stools or chairs, put a board on them and slowly cut off the boards of the desired length. At this stage, the most important thing is to monitor the cut so that it is smooth, without bevels. Also, after sawing on the necessary components, we round the ends of the boards, it should turn out as in the figures.

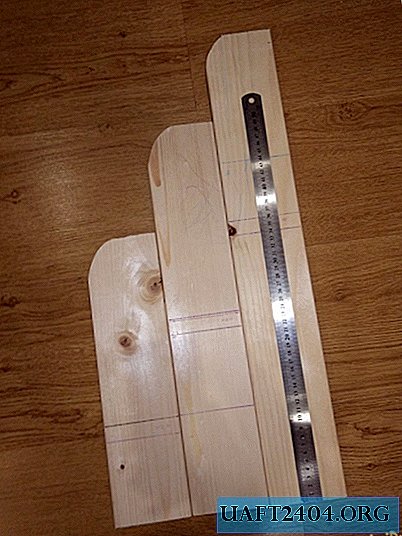


Figure 4 - right side, figure 5 - left, figure 6 - steps, figure 7 - lower and second longitudinal guides. The guides will carry two important functions: they fasten all the side boards together, the steps are mounted on the boards. The lower guide has a third function: it will not let our stand roll over when the child climbs to the very top step.
Next, you need to apply a second marking, for attaching the steps.

The final part is the assembly. At this stage, act very carefully, here the rule applies: "measure seven times, cut once." Slowly screw the boards to each other. As soon as you are going to screw in a new self-tapping screw, always see if any edge has “gone”. Do not forget to sand the boards in the place of cuts, first of all, the safety of children, we do not need splinters.
The result should be such a cute stand for a child.


Total:
The amount spent on materials is 276 rubles, the cheapest stand in the store costs from 500 rubles, but this is for the plastic version with one step!
As I said above, I did not find analogues, yes, there are instances of wood, with two steps, but they cost from 1500 rubles, and they are without handrails, i.e. end like ordinary stools, for me the most important thing is the safety of my child. With such a stand, as it turned out with us, the child will never stumble and will not slip from the edge.
I can safely say that for 276 rubles this is the best solution, the benefit, if you take into account the store wooden stand, 1500 - 276 = 1224 rubles, or (1500/276) * 100 = 543% !!!
Good crafts to you.
Share
Pin
Tweet
Send
Share
Send

