Share
Pin
Tweet
Send
Share
Send
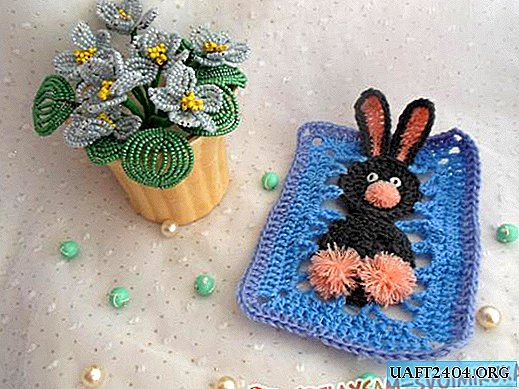
We will not hesitate for a long time, but just right now, we will consider a detailed master class on creating an Easter card:
• Green cardboard marbled A4 sheet;
• The circle cut down under a salad tone;
• Picture with spring bunny;
• Three sheets of scrapbook paper in green and light green colors;
• Watercolor paper;
• Turquoise cut butterfly;
• Small acrylic buttons;
• Blue wooden buttons with polka dots;
• Salad lace with elastic;
• Openwork lace tiffany color;
• Bright salad ribbon in white polka-dot polka dots with a width of 10 mm;
• Yellow and orange flowers;
• Green complex stamens;
• Paper camomile;
• White berry in sugar;
• Peach net;
• Polymer flowers;
• Stamp "Happy Easter", aquamarine ink;
• Lace puncher;
• Double-sided tape, pencil, PVA glue, ruler, scissors, lighter and glue gun.


First of all, we cut a rectangle of 10 * 30 cm from cardboard. Divide it exactly in half and fold the base of the card 10 * 15 cm. It turns out that we have a vertical base.


Three steps will now be cut from scrapbook paper.


Cut two large rectangles on the back and the lower front layer of the postcard. We cut out the other three figures of such sizes and make them lace below.


Now glue on each other layer by layer.


Glue a circle on top and a picture with a bunny. Sew the bunny on a typewriter. We also make strips with a puncher and glue them on the watercolor inner blank 9.5 * 14.5 cm.


By double-sided tape we glue all three parts inside, outside and behind the base of the card.


We flash the back and front parts with the machine along with the base. We stamp the inscription "Happy Easter".


Cut two strips of salad lace on an elastic band and glue it in tiers to the card. We cut out another lace strip from tiffany color lace and glue it to the postcard as well.


The rest of the decor is also glued, as in the photo. Done, there was such a spring Easter card in green and light green color.

Share
Pin
Tweet
Send
Share
Send